Unreal Engine Blueprint & UI Patterns
Blueprint and UI Patterns
Blueprints aren’t just for rapid prototyping—they’re often the production layer for menus, settings, and game-state glue.
UI is also where projects quietly rot: duplicated graphs, inconsistent defaults, and “Apply” buttons that only work on the first map. This post turns the raw notes into a repeatable workflow you can standardize across your project.
We’ll focus on:
- a navigation pattern (
WidgetSwitcher+ Interfaces) - an Apply -> Save pipeline (graphics + audio)
- persistence patterns (options + collectables)
The UI Pipeline
If you want your UI to feel professional, treat it like a pipeline with a single source of truth:
- Navigate: one root menu that switches pages (no widget spam).
- Represent: UI widgets display data (not magic numbers).
- Apply: set the runtime value (so the player immediately sees the effect).
- Persist: save the final state to a
SaveGameslot. - Restore: load on startup/menu open and push values back into the UI.
Scalable UI Hookups
Instead of hard-coding button logic across ten widgets, use Interfaces and a WidgetSwitcher so navigation is centralized and predictable.
1. The Widget Switcher Pattern
Organize your menus (Main, Join, Options) inside a single WidgetSwitcher. This allows you to transition between pages without constantly creating and destroying widgets.
Blueprint Logic:
- Create a
UserWidget(Main Menu). - Add a
WidgetSwitcherand add 3 children:Canvas_Main,Canvas_Options,Canvas_Credits. - Bind buttons to
SetActiveWidgetIndexto swap views instantly.
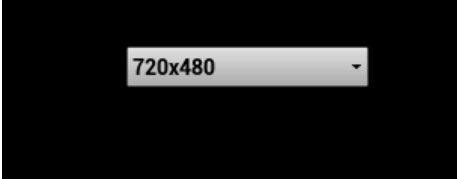
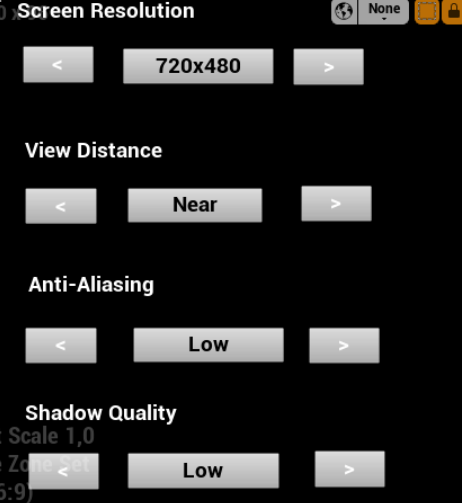
2. Resolution & Graphic Lists (ComboBox vs Spin Box)
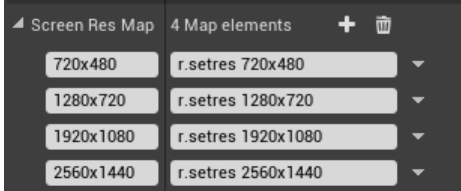
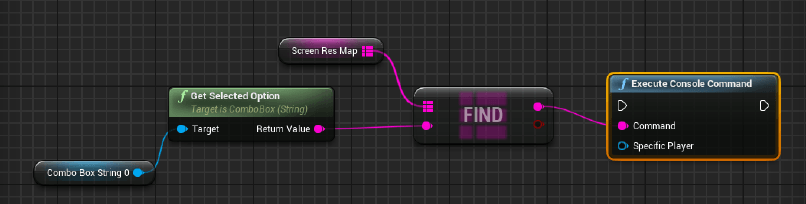
Once navigation is solved, settings become a data problem: you need a UI label (e.g. “1920x1080”) to map to an action (e.g. r.SetRes 1920x1080w).
In UE5 production, you’ll often route resolution/quality through UGameUserSettings instead of raw console commands, but the mapping idea is the same.
List Method (ComboBox):
- Create a
ScreenResMap(String to Command Map). - Key: “1920x1080”, Value: “r.setRes 1920x1080w”.
- On
SelectionChanged, find the value in the Map and execute the console command.
Button Method (Spin Box / Arrows):
- Use a String Array:
["Low", "Medium", "High", "Epic"]. - Use an integer
CurrentIndex. - Right Arrow:
CurrentIndex = (CurrentIndex + 1) % Array.Length. - Left Arrow:
CurrentIndex = (CurrentIndex - 1) < 0 ? Array.Length - 1 : CurrentIndex - 1. - Get the string at
CurrentIndexand apply settings.
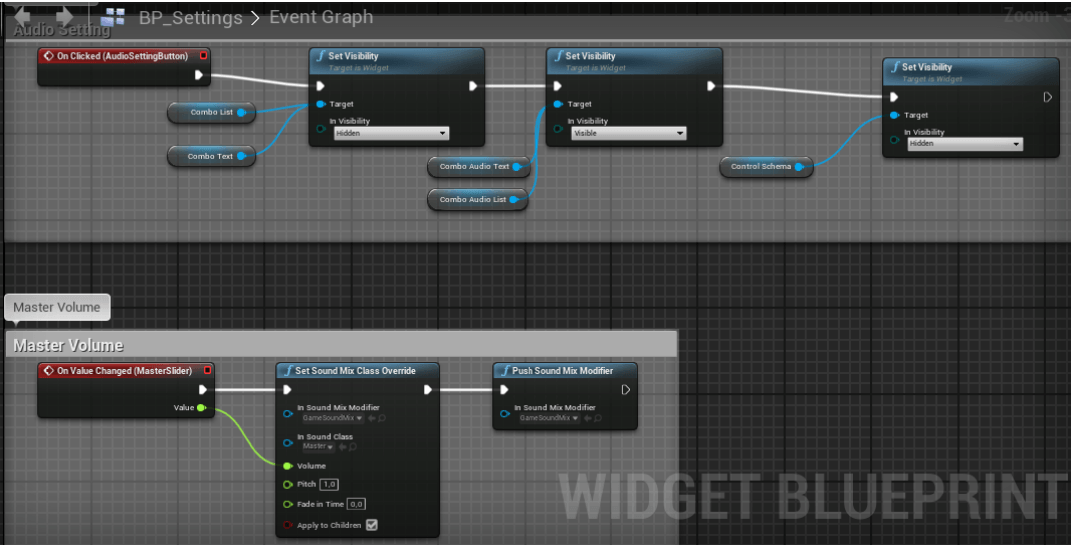
Audio Settings
Audio is the easiest category to get right—and the easiest to make inconsistent—so wire it into the same Apply -> Save pipeline as graphics.
Create a separate WBP_AudioSettings widget:
- Slider: Bind
OnValueChanged. - Logic: Call
SetSoundMixClassOverride. - SoundMix: You must create a SoundMix asset and a SoundClass (e.g., “Master”, “Music”, “SFX”).
- Volume: Convert the 0-1 slider value to decibels if necessary, or use the direct multiplier node in newer engine versions.
Blueprint Game Settings Persistence
To make settings “stick,” you need to bridge the UI with a SaveGame system. The key is to treat the Apply button as your transaction boundary.
Workflow:
- Change: User moves a slider (e.g., Master Volume).
- Apply: Use the
SetVolumeMultipliernode. - Store: Save the new float value into a
USaveGamevariable. - Init: On
Event Construct, load the SaveGame and set the slider’s initial position.
For the C++ side of save/load (slot creation, fallback defaults), see: Save and Load Game C++.
BP Save Graphic and Audio Settings
The clean pattern is: apply settings (so the player sees the change instantly) and then persist the final values into a SaveGame slot when the user clicks Apply.
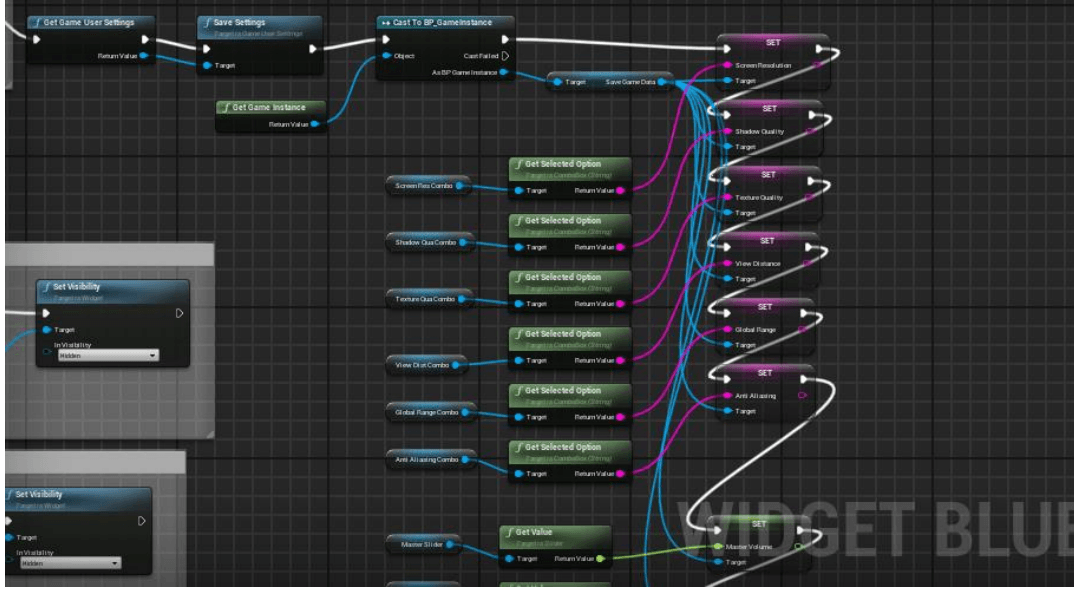
Use Event PreConstruct (or Event Construct) to initialize the UI from the save data so text, combo boxes, and slider values are correct when the menu opens.

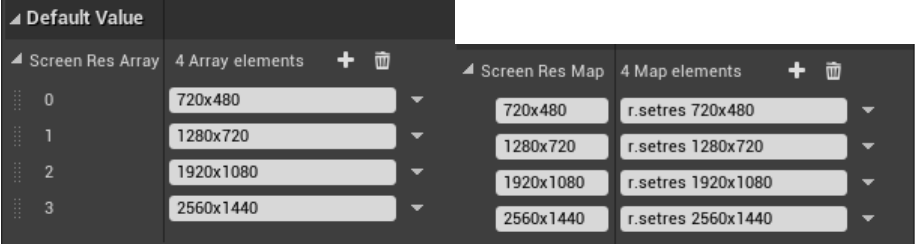
Graphic Settings (with list)
This approach uses a ComboBox (or multiple ComboBoxes) and a Map (e.g., ScreenResMap) that translates a UI label into a console command like r.SetRes 1920x1080w.
If you’re building a settings menu you plan to ship, consider driving the final apply step through UGameUserSettings and using console commands as a quick prototype/debug tool.
Blueprint screenshots

Finish with an Apply button that executes the mapped commands and then saves the chosen values.
Graphic Settings (with button)
If you prefer arrow buttons (increase/decrease), store your options in an array and advance an index. This avoids dropdown UX and works well for controllers.
Blueprint screenshots

A Space variable is commonly used as a small formatting helper (e.g., preventing extra separators when printing labels).
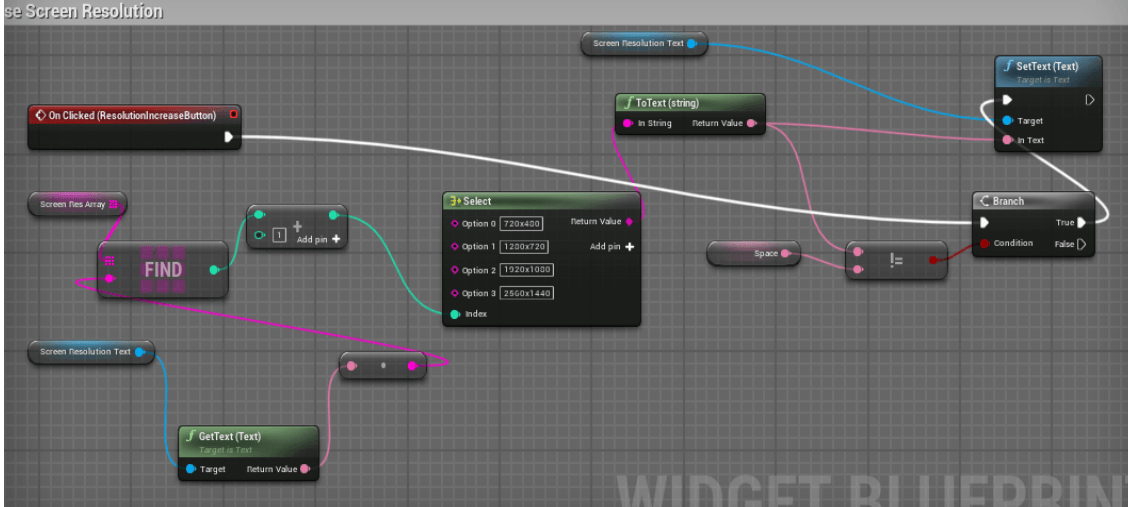
Apply and save using the same final step as the list-based system.

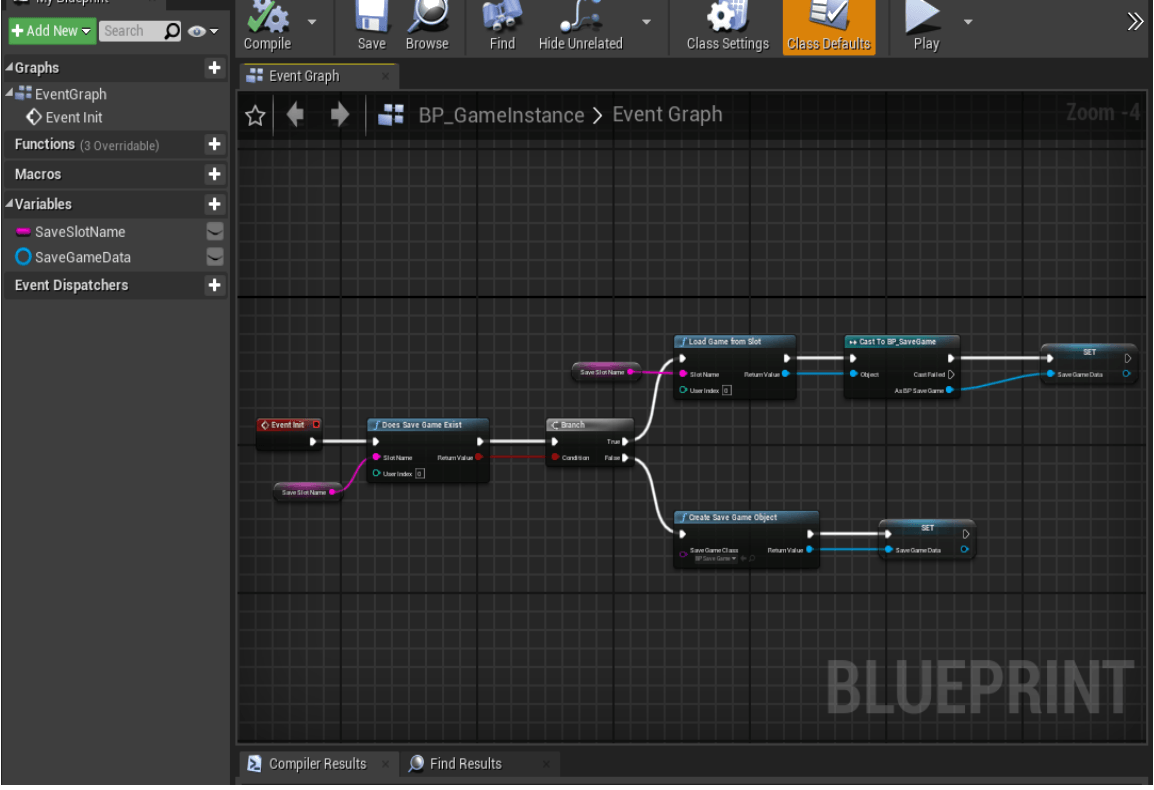
Create Game Instance and Save
Use a custom GameInstance to hold references like SaveSlotName and SaveGameData. This gives you an in-memory “current settings” object that survives level transitions, while SaveGame handles persistence to disk.
BP Create Collectable Object
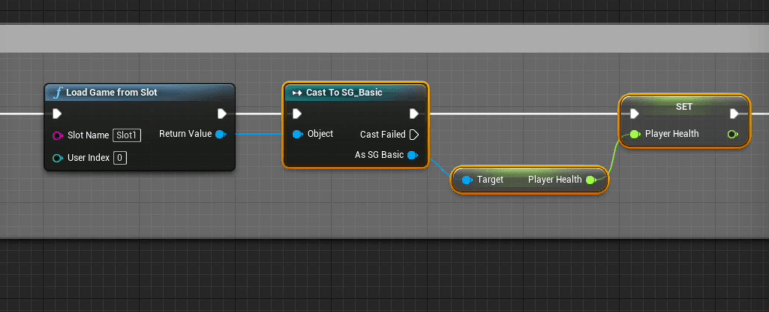
The exact same persistence mindset applies to gameplay. When creating a game with hundreds of collectables (coins, notes, quest items), you need a way to track which ones have been picked up across level transitions and between play sessions.
The Solution:
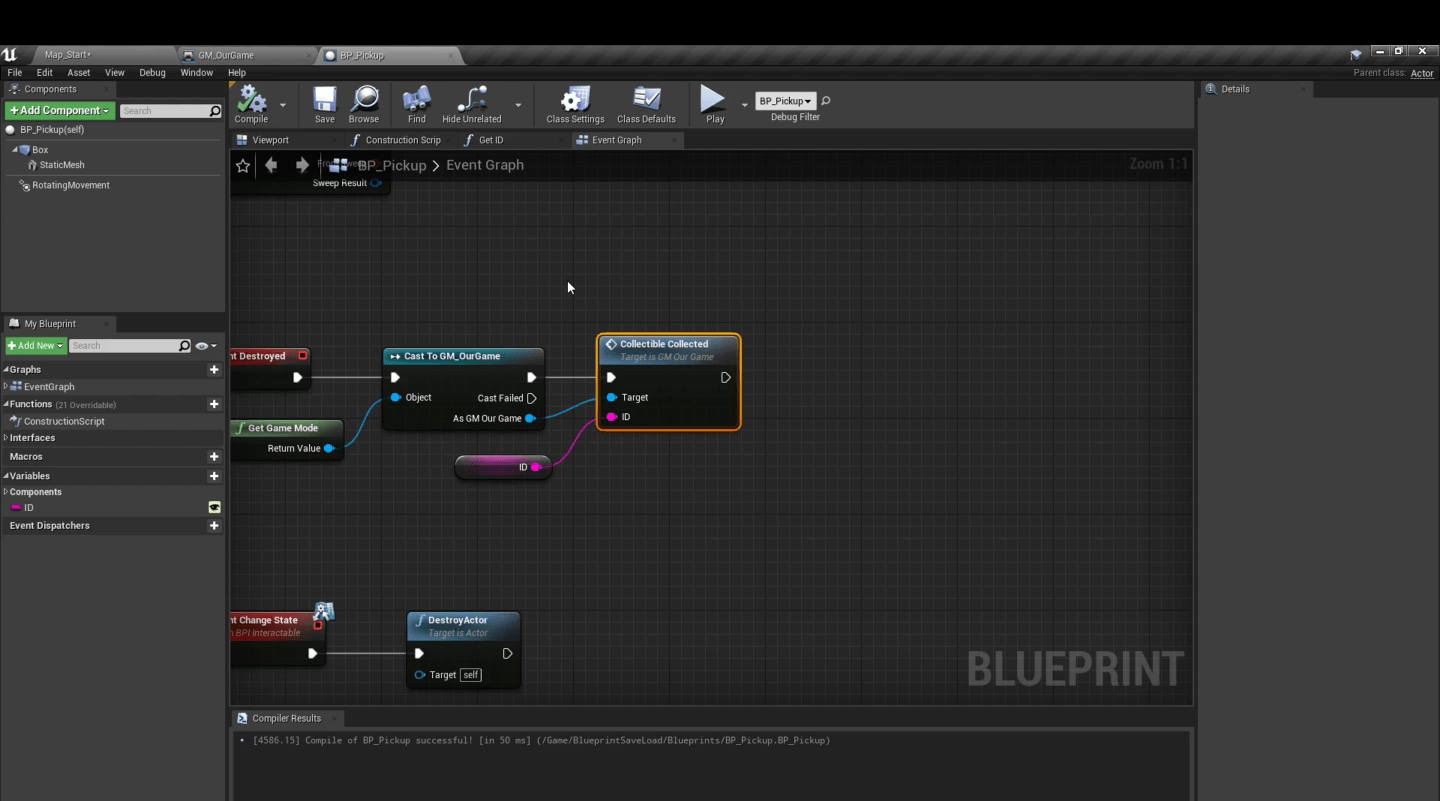
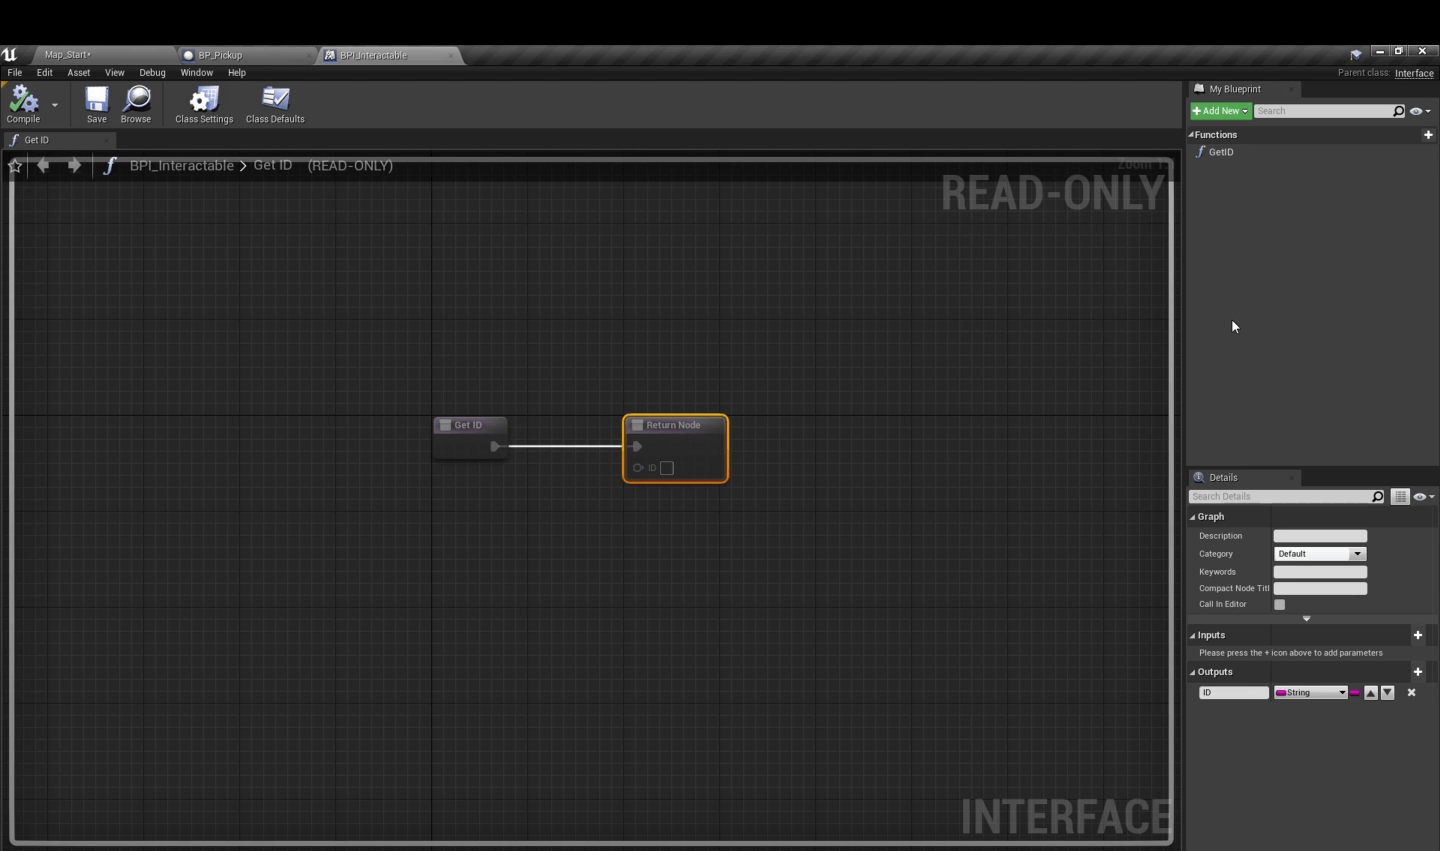
- Create a UniqueID for every collectable actor in the level (usually a String).
- When the player picks up an actor, add its ID to a
TArray<FString>in theGameInstance. - On
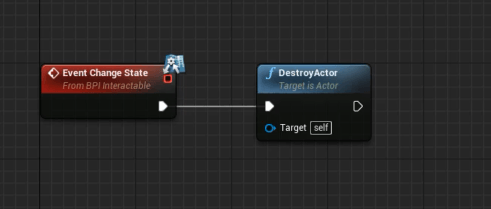
BeginPlayfor a collectable, check: “Is my ID in the GameInstance list?” - If True,
DestroyActor(it was already collected).
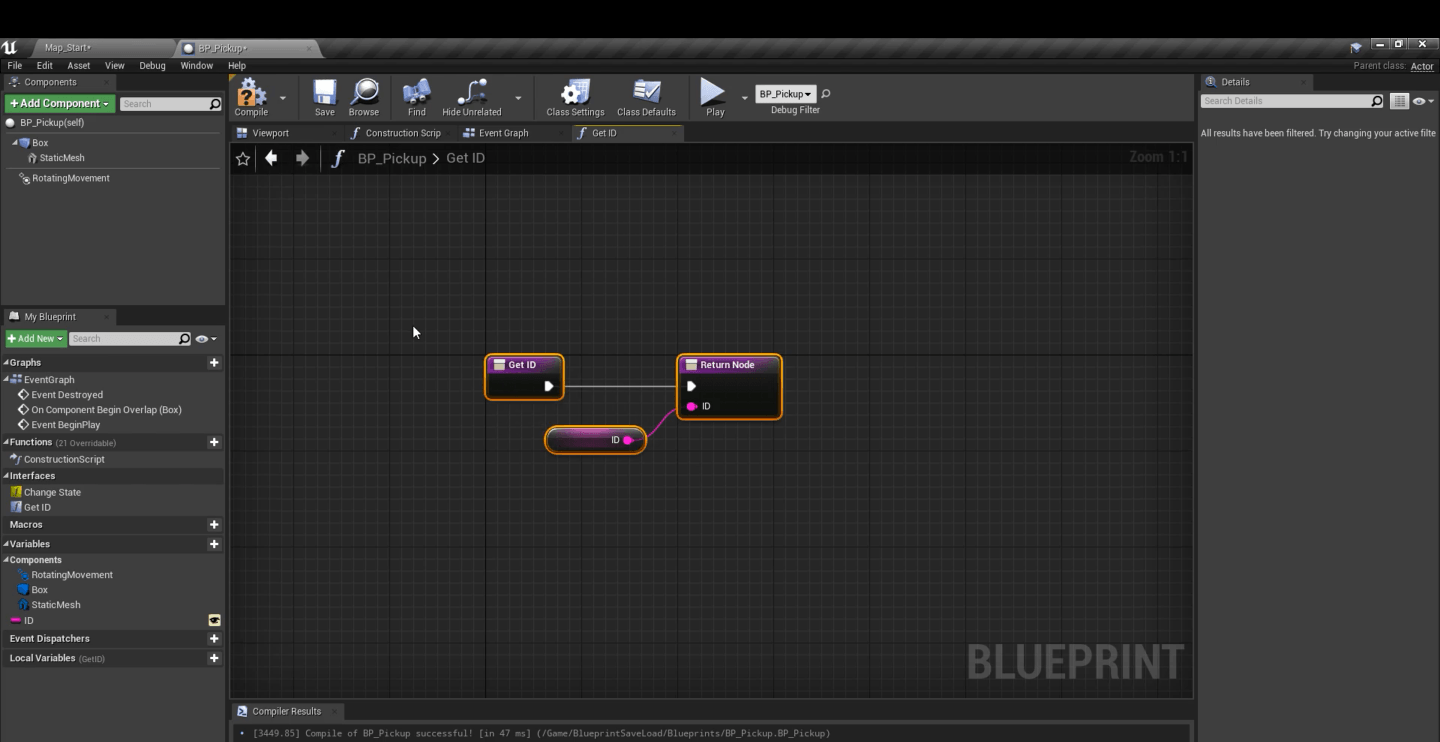
Blueprint steps (UniqueID collection)
1) Create UniqueID

2) Return UniqueID
3) Save Collectable UniqueID (when you hit the object)
4) Get UniqueID
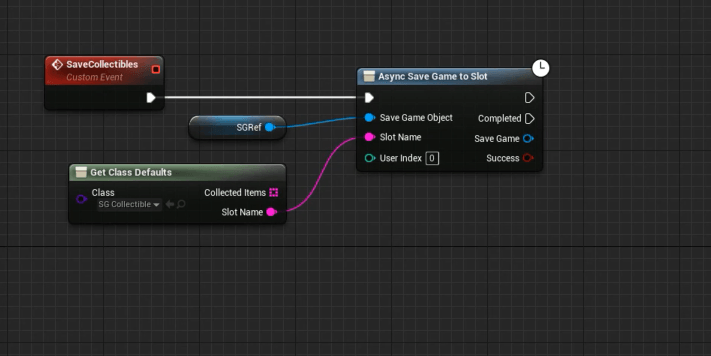
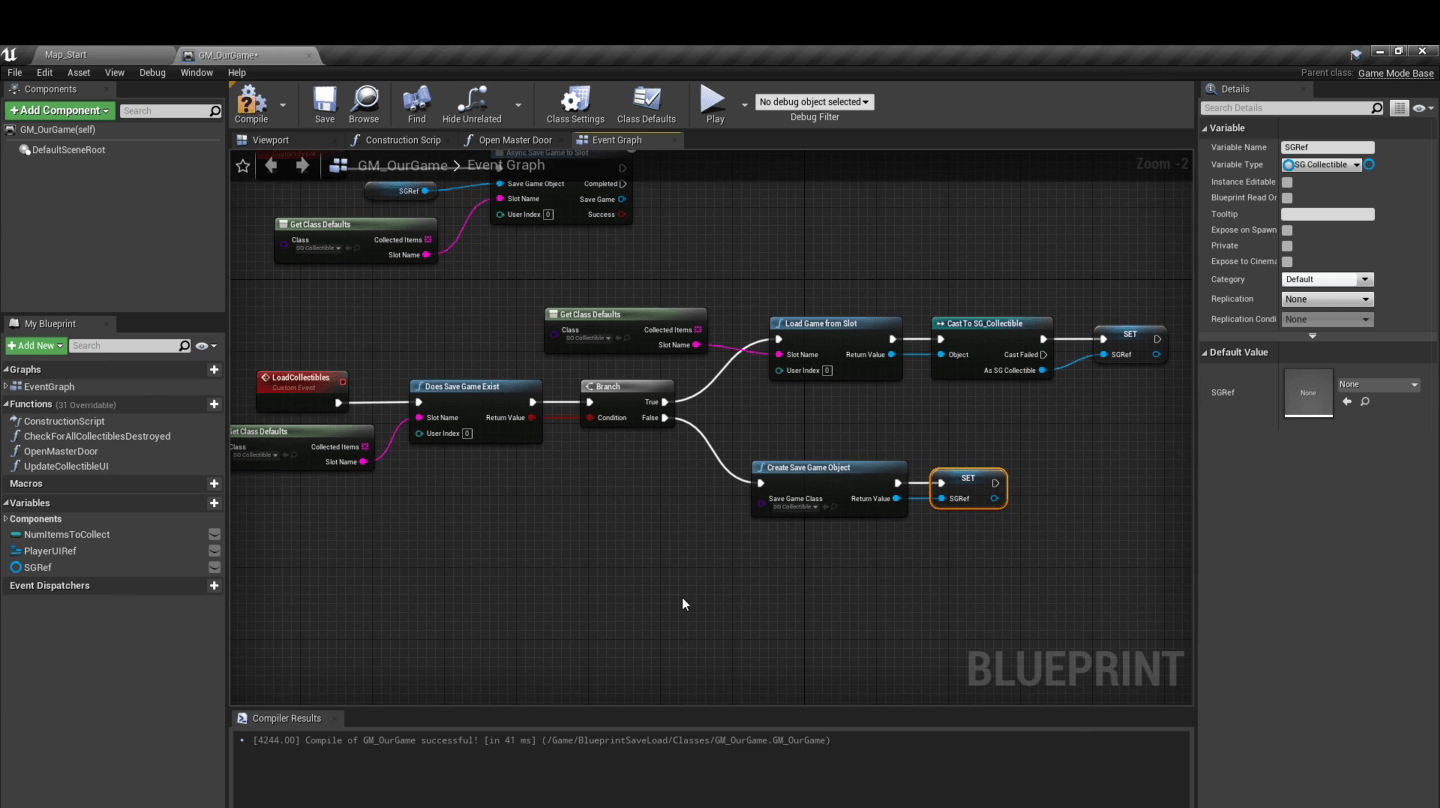
5) Save Collected Object
6) Load Collected Object
7) Level Blueprint Change State
Implementation Reference (Blueprint Graphs)
The next few sections show the same settings pipeline broken into individual graphs. Use them as reference when rebuilding your own menu flow.
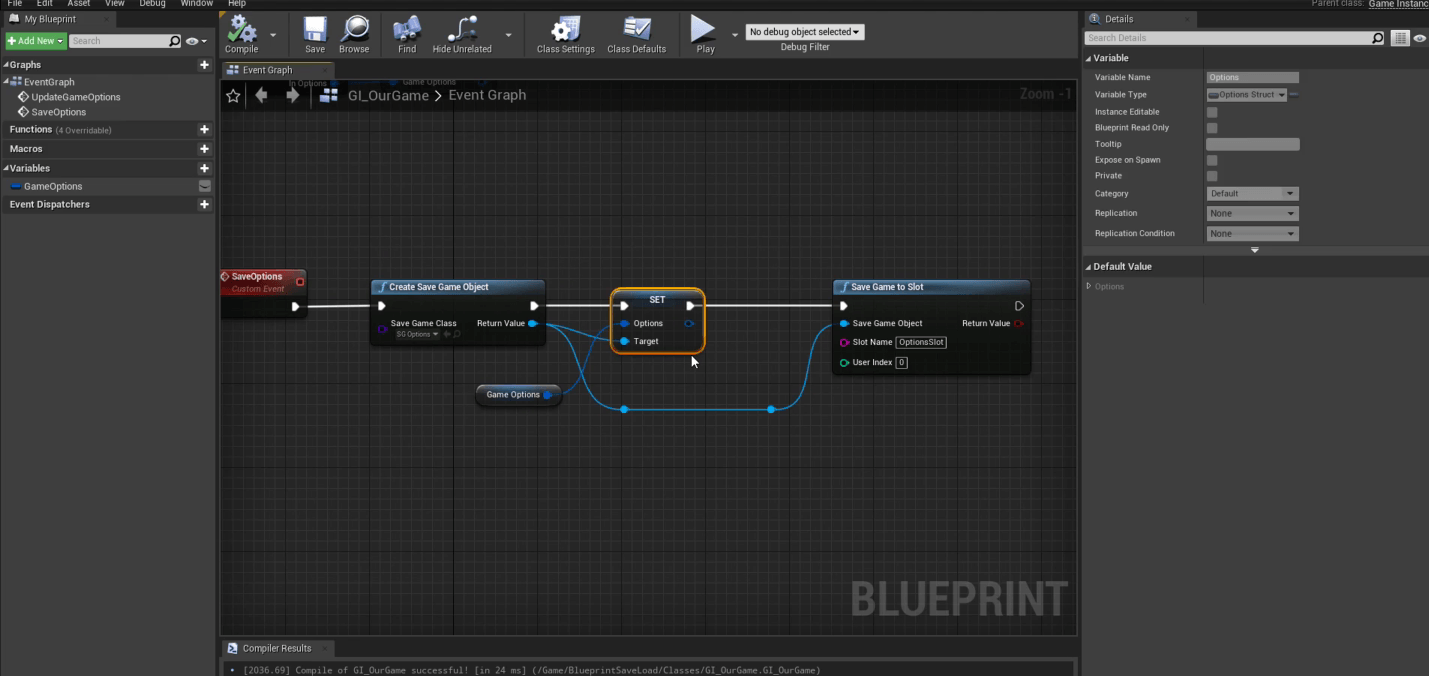
BP Set Game Options
This blueprint sets the chosen values (resolution/quality/audio/etc.) into your runtime variables (often stored in GameInstance) before saving. In other words: update the source of truth first, then persist.
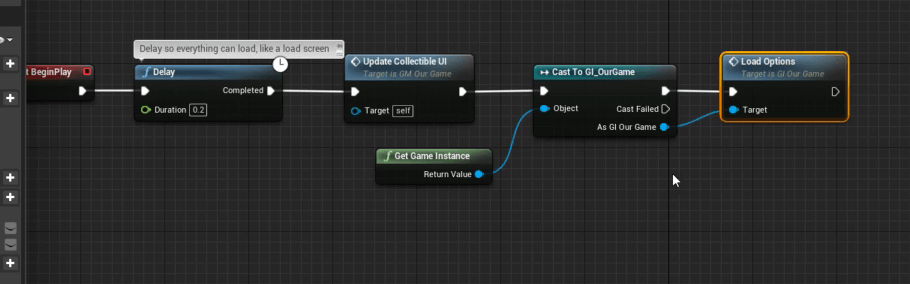
BP Load Options
Load the saved options and push them into your menu widgets so the UI reflects the current configuration (not the defaults).
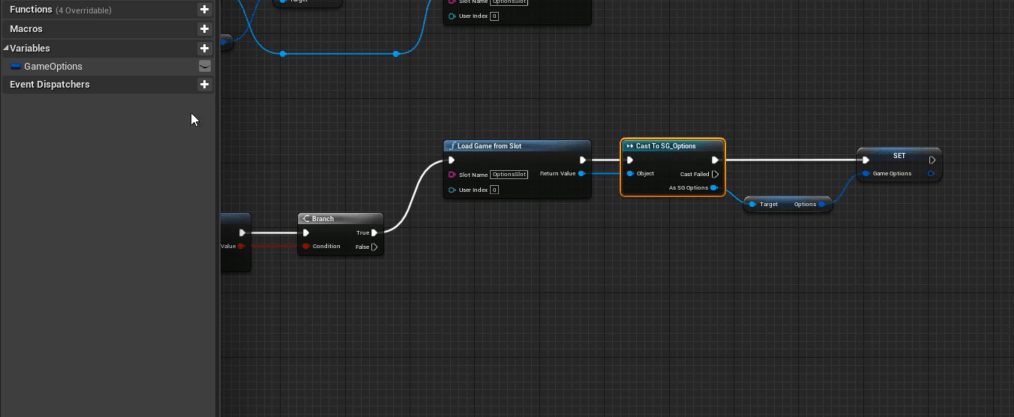
BP Load Save
Load the save slot on boot (or menu open) and prepare your option structs/variables for use.
BP Create Game Options
Create a single data container (struct/object) that holds all settings so saving/loading stays simple and consistent.
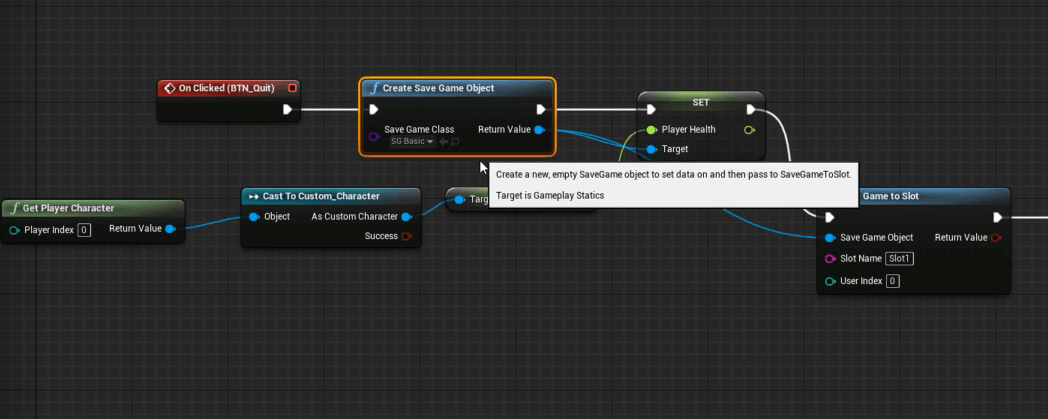
BP Create Save
Create the SaveGame object and initialize it with defaults if no save exists yet.
Widget Animation C++
Once the system is correct, you can make it feel premium. If you build hover/press animations inside a Widget Blueprint, you can play them from C++ by binding to widget events and using BindWidgetAnim.
YourWidget.h
private:
    UPROPERTY(meta = (BindWidget))
    class UButton* YourButtonName; // must match the widget element name

    UPROPERTY(Transient, meta = (BindWidgetAnim, AllowPrivateAccess = true))
    UWidgetAnimation* YourAnimationName; // must match the animation name
YourWidget.cpp
bool UYourWidget::Initialize()
{
    if (!ensure(YourButtonName != nullptr)) { return false; }
    YourButtonName->OnHovered.AddDynamic(this, &UYourWidget::OnHovered);
    YourButtonName->OnUnhovered.AddDynamic(this, &UYourWidget::OnUnHovered);
    return true;
}

void UYourWidget::OnHovered()
{
    if (YourAnimationName)
    {
        PlayAnimation(YourAnimationName, 0.0f, 1, EUMGSequencePlayMode::Forward, 2.0f, false);
    }
}

void UYourWidget::OnUnHovered()
{
    if (YourAnimationName)
    {
        PlayAnimation(YourAnimationName, 0.0f, 1, EUMGSequencePlayMode::Reverse, 2.0f, false);
    }
}
Next Steps
- If you want a stronger C++ foundation for UI exposure and reflection, start at: Core Fundamentals
- For the C++ side of persistence, DataTables, HTTP/JSON, and Asset Manager, see: Data & Integrated Systems
- For scalable event-driven architecture that keeps UI code clean, see: Advanced C++ Patterns